

Introduction
In this guide you will learn how to use the Admin Console to add a host definition to the server.
A host definition is required before the Server can connect to a host and each host that you wish to connect to needs its own definition.
Intended Audience
This guide is primarily of use to administrators who wish to:
Requirements
Before starting, the following components are required:
- An installation of the Server
- Internet Explorer 6 or above
- If one or more console users has been defined on the server, then the username and password for a console user with Administration rights will also be required.
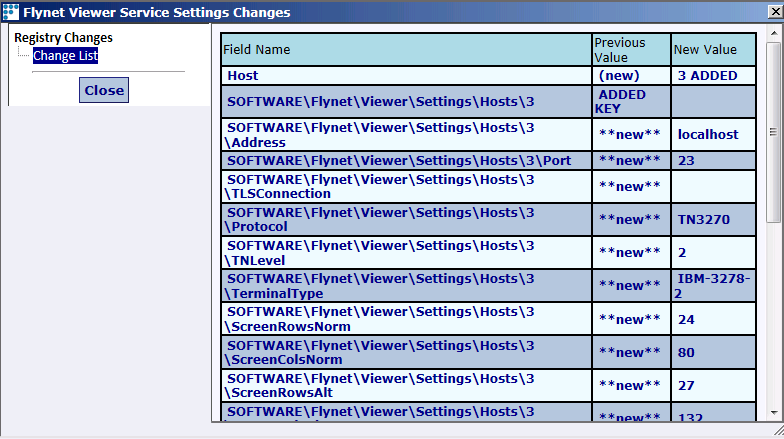
2 : Changes made to these settings are saved when the Apply button is pressed. A summary of any changes made is displayed in the right-hand panel:
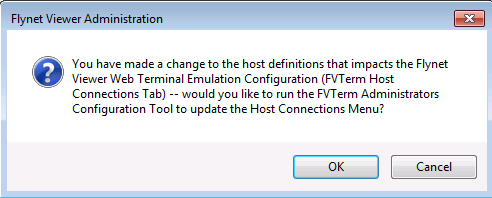
3 : If a new host is added or an existing host is removed then a dialog will be shown which provides a short cut to the Terminal Emulator Configurator. Pressing OK on this dialog will open the configurator:
Settings
This section contains details of the commonly modified settings. For details on the settings not mentioned below please see the Host Settings Reference of the Main Help.
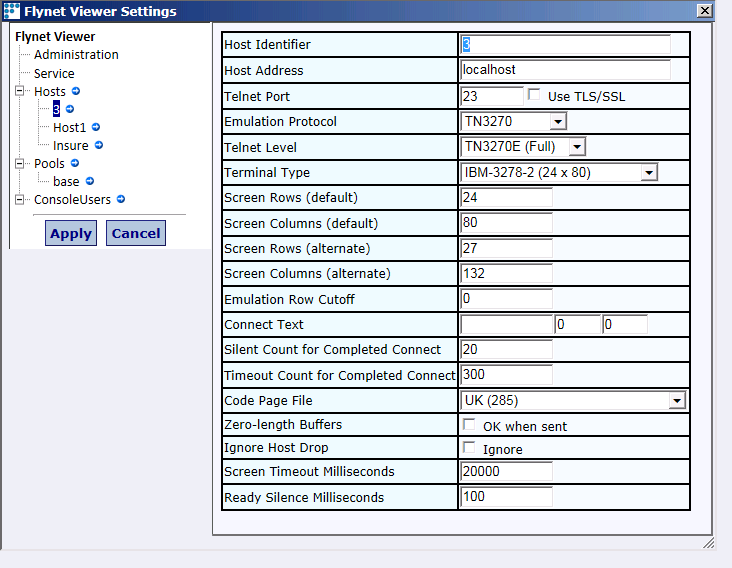
Host Identifier
The logical name for the host. Appears on the FVTerm connection page and can be used via the JavaScript API to connect to a specific host.
Host Address
The IP address or DNS name of the target host.
Emulation Protocol
Select the protocol used to establish a terminal session on the target host. The options are:
- TN3270 – for IBM Mainframes running CICS or IMS, supports standard TN3270, basic TN3270E and full TN3270E via the Telnet Level setting
- TN5250 – for IBM AS/400 and I/Series, includes “extended” TN5250 functions
- VT100/VT220 – for UNIX character-mode applications. Supports many VT330 features as well as SCO-ANSI, ADDS-Viewpoint and Wyse
Telnet Level
For TN3270 and VT100/VT200 protocols. Select the specific flavour of the protocol the host supports.
For TN3270 the options are:
- TN3270 – the original TN3270 protocol
- TN3270E (Basic) – adds the ability to specify the target logical unit
- TN3270E (Full) – adds buffer headers, transmission ack/nak and error recovery to TN3270E
Select the terminal type for the chosen emulation protocol.
For TN3270 the options are:
- IBM-3278-2 (24x80) – basic terminal type, no support for colour or other characteristics
- IBM-3278-3 (32x80) – as above but assumes an alternate screen of 32 rows by 80 columns
- IBM-3278-4 (43x80) – as above, alternate screen size of 43 rows by 80 columns
- IBM-3278-5 (27x132) – as above, alternate screen size of 27 rows by 132 columns
- IBM-3278-2 EAttrs (24x80) – Supports extended attributes and colour
- IBM-3278-3 EAttrs (32x80) – as above, alternate screen of 32 rows by 80 columns
- IBM-3278-4 EAttrs (43x80) – as above, alternate screen size of 43 rows by 80 columns
- IBM-3278-5 EAttrs (27x132) – as above, alternate screen size of 27 rows by 132 columns
For TN5250 the options are:
- IBM-5251-11 (24x80 mono) – basic terminal type 24 rows by 80 columns
- IBM-3477-FC (27x132 colour) – colour 27 rows by 132 columns
- IBM-3477-FG (27x132 mono) – monochrome 27 rows by 132 columns
- IBM-3180-2 (27x132 mono) – monochrome, alternate screen of 27 rows by 132 columns
- IBM-3179-2 (24x80 colour) – colour 24 rows by 80 columns
- IBM-3196-A1 (24x80 mono) – monochrome 24 rows by 80 columns
- IBM-5292-2 (24x80 colour) – colour 24 rows by 80 columns
- IBM-5291-1 (24x80 mono) – monochrome 24 rows by 80 columns
For VT100/VT200 the options are:
- DEC-VT100 / vt100 - Most basic of the VT terminal types with broadest support
- DEC-VT220 / vt220 - Adds highlighting of data and more efficient cursor sequences
- DEC-VT320 / vt320 - Adds additional protocol features to VT220
- scoansi / ansi - Based on the SCO Terminal family, similar to VT220
- viewpoint / vp90 – ADDS-Viewpoint protocol, compatible with the PICK OS
- wy50 / wyse50 / Wyse 50 – Wyse 50 terminal emulation like viewpoint, maybe required for older applications
- wy60 / wyse60 / Wyse 60 – Wyse 60 terminal emulation, slight differences to Wyse 50
Connect Text, Row and Column
These three settings allow the specification of the location and value of some text that appears on the first screen displayed after a connection is complete in order to speed up the connection process.
If you supply values for these settings then a connection will be ready for use once the text is displayed in the specified location rather than waiting for the various timeouts to expire.
To configure these settings:
- Turn tracing on
- Connect to the host
- View the trace file and locate the first screen shown after a connection is complete (often this is a “Welcome” screen).
- Choose some text from the first screen that is unlikely to change, noting the row and column of the first character of the text.
- Enter the text along with the row and column into the host settings.
- Save the settings by clicking on Apply.
Details of the other settings can be found in the Host Settings Reference section of the Main Help (Administration, Service Settings, Settings Reference, Host).