

Introduction
In this guide you will learn how to configure Server Administration.
This guide will take the user though the process to configure Server Administration.
Intended Audience
This guide is primarily useful to administrators who wish to:
- Change the Access Code
- Change the port on which the Server and Admin Client communicate
- Change which machines can connect an Admin Client to the server
- Change the IP address on which the server listens for Admin Client connections
Requirements
Before starting, the following components are required:
- An installation of the Server
- Internet Explorer 6 or above
- If one or more console users has been defined on the server, then the username and password for a console user with Administration rights will also be required. See the Guide to Admin Client Security for more details.
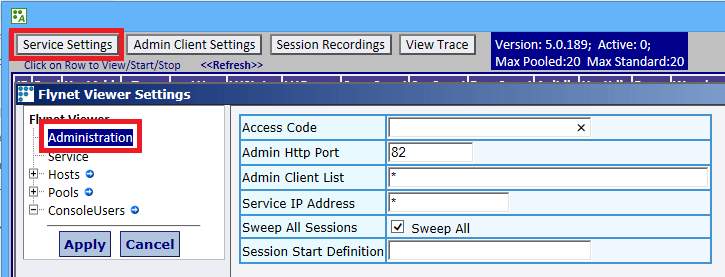
Guide 1. Open the Admin Client (All Programs, Admin Console), click on the Service Settings button. Administration should be selected by default and the Administrative settings should be shown in the right-hand panel:
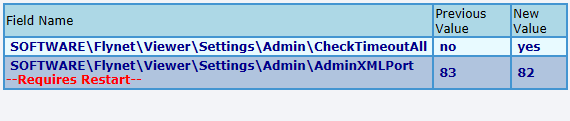
2. Changes made to these settings are saved when the Apply button is pressed. Changes to these settings may require a restart of the Service to become active. If a restart of the Service is necessary, a pop-up will appear when the Apply button is pressed to inform you of this requirement.
3. When changes are applied, a summary of the changes made is displayed in the right-hand panel. If a change requires a restart of the Service, then the summary will indicate this fact:
Settings
Any of the settings listed below that is marked with a * requires a restart of the service to become active.
Access Code*
If you need to change your Access Code, you can do so here. If possible, copy and paste the new key as this will help to avoid errors.
Admin Http Port*
The port on which the Service listens for connections from the Admin Console.
If the port is changed, the Service must be restarted before the Service will start listening on the new port.
Any change to the port must be reflected in the settings of any Admin Client that wishes to connect. See the Guide to Configuring the Admin Client for details of how to change this setting.
Admin Client List
The list of IP addresses (separated by a space) from which Admin Client connections will be accepted.
The default value is *, which allows an Admin Client to connect from any IP address.
If a wrongly entered or unavailable IP address renders the service uncontactable by any Admin Client, then the list can be reset to the default by editing the registry on the server machine. Use regedit to set the value of Valid Admin Clients in this key:
HKEY_LOCAL_MACHINE\SOFTWARE\Flynet\Viewer\Settings\Admin
Back to *.
Service IP Address*
The IP address on which the service listens for Admin Client connections. See also Admin Http Port above.
The default value is *, which means that the service listens on all available IP addresses.
This setting is useful if the machine has more than one network adapter to restrict connections to a particular network.
Sweep All Sessions
Controls which sessions are available to be automatically timed-out. If Sweep All Sessions is checked then all sessions, irrespective of their current status, can be timed-out. If Sweep All Sessions is not checked then only sessions that are not actively reserved can be timed-out.
Session Start Definition
The name of the host (in the list of defined hosts) to use when starting a session via the pop-up menu.
The default value is blank (empty) which means that the first host in the Hosts list will be used.
This setting can also accept more complex values which allow control of various parameters for the new session. Further information on this can be found in the Main Help (All Programs, Main Help). Look under Administration, Service Settings, Settings Reference, Administration, Session Start Definition.