

Introduction
This guide covers the method to select user preferences including, visual appearance and connection host and action choices.
Audience
End User.
Requirements
Before starting, the following components are required:
- An existing installation of Flynet Viewer Server, configured and working.
- Internet Explorer 6 or above or some other browser running on a computer that has access to the above.
- Relevant security authorization.
(Most of the above environmental specifics should be provided by your system administrator before starting this guide.)
Related Documentation
- User Reference Guide.
Guide
The Preferences dialogue is displayed by clicking on the  Preferences Icon in the lower left of the Flynet Viewer window. To close the dialogue, click on the "Hide Preferences" button or click on the Preferences Icon while the dialogue is displayed.
If this icon is not visible, it probably means that your Flynet Viewer server has been configured in "locked-down" mode, and all preferences are pre-set for you...contact your server administrator for more information.
Note: depending on your server's configuration you may not see all of the fields possible in the preferences dialogue. In many situations, it enables consistency across all users for the server administrator to configure the server so that you do not have access to change many of the fields shown.
Click on any field in the following picture of the Preferences dialogue to view the help for that field:
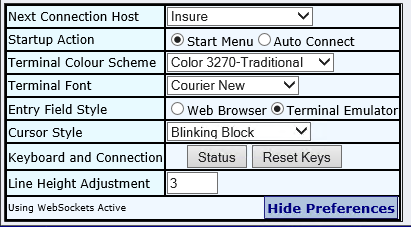
Next Host Connection and Startup Action
Selecting a host form the Next Host Connection will cause FVTerm to connect to that host when the connect icon is clicked or if Startup Action is set to Auto Connect the next time the FVTerm page is navigated to, or the page is refreshed, FVTerm will connect automatically to that host.
Visual Preferences
Terminal Colour Scheme
This will select the screen appearance and the way the host and the host application controls what is on the screen. There are a number of terminal styles which may be provided or modified by your operations or administrator. By default, there will be a standard style, 2 choices for 3270 and 5250 terminal types and one for VT100/220 character based terminal types. These are based on normal HTML style sheet files and the capabilities of each can be viewed in your browser by going to:
http://yourhost.local/fvterm/attrstyles.html
Terminal Font
The default font is Courier New, which is a fixed width font. Changing the font will only affect the look of the session but unless your host is capable of correctly formatting variable width characters.
Entry Field Style You can select your preference for the way entry fields appear. Selecting Web Browser may have an effect on the cursor style. The selection will have no effect on the operation of the host of the application.
Web Browser Style
The Web Browser entry field style uses standard IE entry fields, which are compatible with other entry fields in the Windows environment. Full clipboard, insert location, selection and so on will work as it does with other applications. As with other input fields in Windows, the Web Browser input field has an indented thin border around it. For those accustomed to Windows applications, this is helpful because it identifies the entry field locations and their widths. This can also be distracting to users that are accustomed to traditional terminal emulation packages; this field type also requires more vertical space for each line.
If you prefer the Web Browser entry field style you will also want to utilize the Line Height Adjustment setting to ensure that the entry fields vertically overlap to your preference.
Terminal Emulator Style
The Terminal Emulator entry field style is implemented using direct keystroke processing and direct cursor control. It behaves more like the traditional terminal emulator in that fields are not identified with borders, and the cursor is, by default, in overstrike mode.
For large, busy screens, this may be the preferred style, since the vertical space requirement is less. The style sheet used can also provide a back lit effect on entry fields so that for those unfamiliar with a particular screen, the location and width of fields is not "invisible" as it is with many traditional terminals and terminal emulators.
Cursor Style
You can select your preference for cursor. Either block or underscore and steady or blinking. The selection will have no effect on the operation of the host of the application.
Line Height Adjustment
The Line Height Adjustment field is useful in "tweaking" the appearance of your screen so that individual rows do not overlap and/or have the right amount of space in-between them.
When using the Web Browser entry field style, this setting can be used to prevent vertical overlap of entry fields on busy screens (where two entry fields are adjacent vertically).
Be aware of the fact that the higher you set this number, the taller the emulator window will need to be in order to fit the full screen image.
Keyboard and Connection
The Status button will take you to the same information pop-up that clicking on the ready status message would and Reset Keys does the same as the same button on the Keyboard Mapping tool. It will return your key mapping to the one set up by your operations or administrator.